Low Voltage Tester
Locating Hidden Electrical Wires in Walls Without Breaking Them
Drilling into walls to hang pictures, install shelves, or mount interior fixtures is a very common need in households. However, behind that smooth layer of paint often hides a complex web of electrical wiring that the naked eye cannot see. A drill bit striking the wrong spot can sever a wire, cause a short circuit, and cost you significant effort breaking the wall to fix the connection. To avoid unnecessary risks, we can entirely locate the wiring path through keen observation combined with technical support tools.

Below are practical insights to help you feel more confident whenever you hold a drill, ensuring both aesthetics and safety for the home electrical system.
Judgment Based on Wiring Principles in Construction
The first and most effective tool is your own logical thinking regarding electrical system layout. In modern buildings or well-executed apartments, electricians always adhere to perpendicular wiring rules to facilitate future maintenance. Understanding this rule helps you avoid most risks right from the initial observation step.
Electrical wires are usually routed along vertical or horizontal axes; they rarely run diagonally across the wall, except in cases of sloppy workmanship or self-built houses without blueprints. Look at the positions of existing outlets and switches. Wires will typically run straight from the ceiling down to the switch or from the floor up to the outlet. Another possibility is that wires run horizontally across the wall to connect outlets, usually at a height of about 30cm to 50cm from the floor.
From these observations, visualize perpendicular lines originating from electrical devices. The area lying on these imaginary lines is exactly where you need to avoid drilling. The empty wall space between these vertical and horizontal axes is generally safer. However, this method is only relatively reference-based. For greater certainty, we need the support of specialized detection devices.
Using Contactless Voltage Detectors to Zone the Signal
Observation with the naked eye is not enough; a contactless voltage detector is a simple yet effective technical solution. This device operates based on the principle of sensing the electromagnetic field emitted around wires carrying alternating current without needing to touch the copper core directly.
Common non-contact voltage tester lines like the Hioki 3481-20 often have quite good sensitivity to household voltage, helping to catch signals through thin paint layers easily. You should turn on electrical devices in the room such as lights, TVs, or plug a fan into the socket on the wall intended for drilling to ensure the wire is under load. The larger the current flowing through the wire, the stronger the generated magnetic field, helping compact devices like the Kyoritsu 5711 detect wire positions faster.
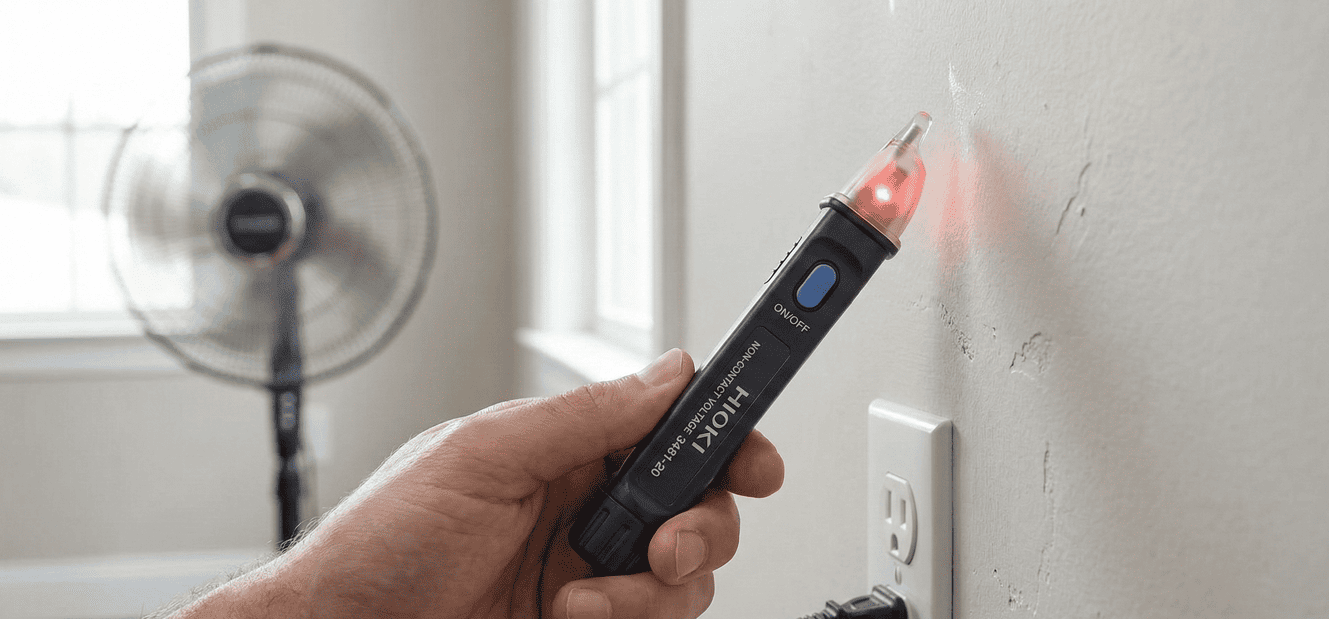
Move the detector tip slowly along the wall surface, starting from the outlet position and gradually spreading out in the initially predicted direction. When the device emits a sound or the indicator light glows, it is a sign that there is an electrical wire running right beneath the plaster layer. Use a pencil to lightly mark the wall to define a safety corridor. Note that the thickness of the plaster layer can affect the signal, so scan back and forth a few times at different speeds for the most objective result.
Applying Multi-function Scanners to Detect In-wall Objects
For thick walls, reinforced concrete walls, or when you need higher reliability for deep drill holes, pen-style voltage detectors are sometimes limited by depth. At this point, multi-function scanners or wall scanners will prove effective. This is a higher-end line of equipment, capable of distinguishing changes in material density behind the wall surface.
If you work frequently with complex systems, detectors like the CEM LA-1010 will provide significantly better support compared to standard voltage testers. The device helps you clearly distinguish the path of wires, or even identify the location of hidden wire breaks if an incident occurs.
Operating the scanner requires slowness and patience. Hold the machine flat against the wall and move in a zigzag pattern to scan the entire area intended for construction. Modern machine lines often have a distinct live wire warning mode with flashing lights, helping you eliminate the possibility of drilling into a hot wire. Investing in such a device brings long-term value to the family toolbox, making every repair operation professional and effortless.
Safe Drilling Techniques and Cross-Checking Methods
Even though you have applied both logical thinking and supportive machinery, caution in actual operation is always the deciding factor. No method guarantees absolute safety in all conditions, so the best way is to combine data sources together.
Before drilling, cross-check once more. If the intended drilling spot is far from the vertical and horizontal axes of the outlet and a voltage tester like the Fluke 2AC also reports no abnormal signal, you can be more assured. Conversely, if the machine does not signal but that position lies in a straight line with a switch, consider choosing another spot or checking more thoroughly.
The drilling process should start gently. Use moderate force to ease the drill bit in one layer at a time. If you feel the drill bit hitting strange material like plastic conduit or metal, stop immediately and use a flashlight to inspect the drill hole. Turning off the area circuit breaker before drilling is a good habit that protects safety for yourself and the electrical system should a mistake happen. Thorough preparation will help you complete the installation smoothly without encountering any electrical troubles.
-
-
-
-
-
-
-
-
-
-
-
-
-
-
-
-
-
-
-
-
-
-
-
-